EF Core - DevArt Oracle Provider
The dotConnect for Oracle is a high-performance ORM enabled data provider for Oracle that builds on ADO.NET technology to present a complete solution for developing Oracle-based database applications.
- It introduces new approaches for designing application architecture, boosts productivity, and facilitates the development of database applications.
- It also supports a wide range of Oracle-specific features, such as Advanced Queuing, Alerts, etc.
Install EFE Core
Let's create a new application using the Console App (.NET Framework) template and install Z.EntityFramework.Extensions.EFCore.
Entity Framework Extensions (EFE) library is available as a NuGet package and you can install it using NuGet Package Manager.
In the Package Manager Console window, enter the following command.
PM> Install-Package Z.EntityFramework.Extensions.EFCore
You can also install EFE by right-clicking on your project in Solution Explorer and selecting Manage NuGet Packages....
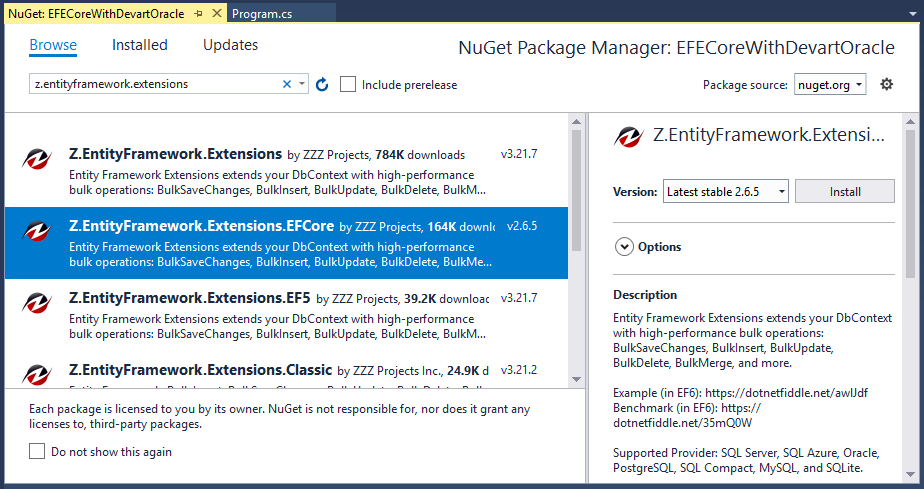
Search for Z.EntityFramework.Extensions and install the latest version by pressing the install button. It will also install Microsoft.EntityFrameworkCore, which doesn't have additional logic that won't apply to all scenarios.
For example, EF Core will need to know what database or datastore you plan on working with and who those providers are in individual packages.
Register EF Core Provider
For DevArt Oracle, first, we need to install dotConnect for Oracle Professional Trial to start your 30-day trial period.
Once the installation is completed, install Devart.Data.Oracle.EFCore in your project using Package Manager Console window. It will get all the packages required for EF Core.
PM> Install-Package Devart.Data.Oracle.EFCore
Now, you are ready to start your application.
Create Data Model
The model is a collection of classes to interact with the database.
- A model stores data that is retrieved according to the commands from the Controller and displayed in the View.
- It can also be used to manipulate the data to implement the business logic.
To create a data model for our application, we will start with the following two entities.
public class Author
{
    public int AuthorId { get; set; }
    public string FirstName { get; set; }
    public string LastName { get; set; }
    public DateTime BirthDate { get; set; }
    public List<Book> Books { get; set; }
}

public class Book
{
    public int BookId { get; set; }
    public string Title { get; set; }
    public Author Author { get; set; }
}
There's a one-to-many relationship between Author and Book entities. In other words, an author can write any number of books, and a book can be written by only one author.
Create Database Context
The database context class provides the main functionality to coordinate Entity Framework with a given data model.
- You create this class by deriving from the
System.Data.Entity.DbContextclass. - In your code, you specify which entities are included in the data model.
- You can also customize certain Entity Framework behaviors.
So, let's add a new BookStore class which will inherit the DbContext class.
public class BookStore : DbContext
{
    protected override void OnConfiguring(DbContextOptionsBuilder optionsBuilder)
    {
        optionsBuilder.UseOracle("User Id=SYSTEM;Password=mw;Data Source=XE");
    }

    public DbSet<Author> Authors { get; set; }
    public DbSet<Book> Books { get; set; }
}
In EF Core, the DbContext has a virtual method called OnConfiguring which will get called internally by EF Core.
- It will pass in an
optionsBuilderinstance which can be used to configure options for theDbContext. - The
optionsBuilderhasUseOraclemethod which expects a connection string as a parameter.
Create Database
Now to create a database using migrations from your model, install the following packages
PM> Install-Package Microsoft.EntityFrameworkCore.Tools
PM> Install-Package Microsoft.EntityFrameworkCore.Design
Once these packages are installed, run the following command in Package Manager Console.
Add-Migration Initial
This command scaffolds a migration to create the initial set of tables for your model. When it is executed successfully, then run the following command.
Update-Database
This command applies the new migration to the database and creates the database before applying migrations.
Now, we are done with the required classes and database creation, let's add some authors and book records to the database and then retrieve them.
using (var context = new BookStore())
{
    var authors = new List<Author>
    {
        new Author
        {
            FirstName ="Carson",
            LastName ="Alexander",
            BirthDate = DateTime.Parse("1985-09-01"),
            Books = new List<Book>()
            {
                new Book { Title = "Introduction to Machine Learning"},
                new Book { Title = "Advanced Topics in Machine Learning"},
                new Book { Title = "Introduction to Computing"}
            }
        },
        new Author
        {
            FirstName ="Meredith",
            LastName ="Alonso",
            BirthDate = DateTime.Parse("1970-09-01"),
            Books = new List<Book>()
            {
                new Book { Title = "Introduction to Microeconomics"}
            }
        },
        new Author
        {
            FirstName ="Arturo",
            LastName ="Anand",
            BirthDate = DateTime.Parse("1963-09-01"),
            Books = new List<Book>()
            {
                new Book { Title = "Calculus I"},
                new Book { Title = "Calculus II"}
            }
        }
    };

    //IncludeGraph allows you to INSERT/UPDATE/MERGE entities by including the child entities graph.
    context.BulkInsert(authors, options => options.IncludeGraph = true );
}

using (var context = new BookStore())
{
    var list = context.Authors
        .Include(a => a.Books)
        .ToList();

    foreach (var author in list)
    {
        Console.WriteLine(author.FirstName + " " + author.LastName);

        foreach (var book in author.Books)
        {
            Console.WriteLine("\t" + book.Title);
        }
    }
}
If you run the application, you will see that authors and books are successfully inserted into the database.
ZZZ Projects